Thursday, 27 April 2017

How to recreate OCR and Voting disk

Restore/Recreate OCR and Voting disk

Restore OCR

1 Locate physical the OCR backups using –showbackup command
[root@ol5-db-host1 bin]#./ocrconfig – showbackup

2 Review the contents
[root@ol5-db-host1 bin]#./ocrdump –backupfile /u01/app/11.2.0.4/grid/cdata/<cluster_name>/week.ocr

3 Stop the Oracle clusterware on all the nodes.
[root@ol5-db-host1 bin]#./crsctl stop crs

4 As the OCR is in ASM disk, we need to start ASM in exclusive mode during restoring OCR
[root@ol5-db-host1 bin]#./crsctl check cluster -all

CRS-4639: Could not contact Oracle High Availability Services
CRS-4000: Command Check failed, or completed with errors.

[root@ol5-db-host1 bin]#./crsctl start crs -excl -nocrs

5 Restore the OCR backup
[root@ol5-db-host1 bin]#./ocrconfig –restore /u01/app/11.2.0.4/grid/cdata/<cluster_name>/backup.ocr

6 Stop and Start the crs normally.
[root@ol5-db-host1 bin]#./crsctl stop crs
[root@ol5-db-host1 bin]#./crsctl start crs

7 Check the OCR entry
ocrdump => this will generate OCRDUMPFILE

*******************************************************************
Restore/Recreate Voting Disk

cd $GRID_HOME/bin

1. Shutdown CRS as root user on all nodes.
[root@ol5-db-host1 bin]#./crsctl stop crs

2. start clusterware in exclusive mode
[root@ol5-db-host1 bin]#./crsctl start crs -excl -nocrs

3. remove the voting disks via
[root@ol5-db-host1 bin]#./crsctl delete css votedisk +DBFS_DG

4. check they are removed via
[root@ol5-db-host1 bin]#./crsctl query css votedisk

5. Readd the voting file in DGFS_DG
[root@ol5-db-host1 bin]#./crsctl replace votedisk +DBFS_DG

6. Stop and start the crs normally on all nodes
[root@ol5-db-host1 bin]#./crsctl stop crs
[root@ol5-db-host1 bin]#./crsctl start crs

*******************************************************************

Validate the OCR and Voting Disks using below link.

How to Validate OCR and Voting Disks

How to Validate OCR and Voting Disks

Validate OCR and Voting Disks

Verify OCR:
*******************************************************************
[oracle@ol5-db-host1 bin]$ cd $GRID_HOME/bin
[oracle@ol5-db-host1 bin]$ ./cluvfy comp ocr -n all

Verifying OCR integrity
Checking OCR integrity...
Checking the absence of a non-clustered configuration...
All nodes free of non-clustered, local-only configurations
ASM Running check passed. ASM is running on all specified nodes
Checking OCR config file "/etc/oracle/ocr.loc"...
OCR config file "/etc/oracle/ocr.loc" check successful
Disk group for ocr location "+DBFS_DG" available on all the nodes

NOTE:
This check does not verify the integrity of the OCR contents. Execute 'ocrcheck' as a privileged user to verify the contents of OCR.
OCR integrity check passed

Verification of OCR integrity was successful.
*******************************************************************
Run ocrcheck as "root" user

[root@ol5-db-host1 bin]# cd $GRID_HOME/bin
[root@ol5-db-host1 bin]# ./ocrcheck

Status of Oracle Cluster Registry is as follows :
         Version                  :          3
         Total space (kbytes)     :     262120
         Used space (kbytes)      :       3836
         Available space (kbytes) :     258284
         ID                       :  187484264
         Device/File Name         :   +DBFS_DG
                                    Device/File integrity check succeeded
                                    Device/File not configured
                                    Device/File not configured
                                    Device/File not configured
                                    Device/File not configured
         Cluster registry integrity check succeeded
         Logical corruption check succeeded

*******************************************************************
Verify Voting Disk:

[oracle@ol5-db-host1 bin]$ cd $GRID_HOME/bin
[oracle@ol5-db-host1 bin]$ ./olsnodes -n -s
ol5-db-host1      1       Active
ol5-db-host2      2       Active
*******************************************************************
[oracle@ol5-db-host1 bin]$ cd $GRID_HOME/bin
[oracle@ol5-db-host1 bin]$ ./cluvfy comp vdisk

Verifying Voting Disk
Checking Oracle Cluster Voting Disk configuration...
ASM Running check passed. ASM is running on all specified nodes
Oracle Cluster Voting Disk configuration check passed
UDev attributes check for Voting Disk locations started...
UDev attributes check passed for Voting Disk locations
Verification of Voting Disk was successful.

*******************************************************************

In Case of corruption of OCR or Voting disk:

Please follow below link

How to recreate OCR and Voting disk

12.2 ADOP Prepare Phase Fails with message " [ERROR]: Domain might be locked by some other WLS user process"

E-Business Suite 12.2 Applications DBA, Online Patching ADOP Utilities issues

On EBS 12.2 When running adop, prepare phase fails with the below error:

Validating configuration on node: [MYSERV]...
    Log: /u01/app/EBSR12/fs_ne/EBSapps/log/adop/14/prepare_20/<Context_Name>
    [WARNING]: There could be issues while validating the ports used for E-Business Suite instance against ports used in /etc/services. Refer the log file for more details.
    [WARNING]: Either some of the required entries in /etc/hosts file might be missing (e.g. localhost or hostname) OR the file /etc/hosts could not be read.
    [ERROR]: Domain might be locked by some other WLS user process
    [UNEXPECTED]Error occurred while executing "perl /u01/app/EBSR12/fs2/EBSapps/appl/ad/12.0.0/patch/115/bin/txkADOPValidations.pl  -contextfile=/u01/app/EBSR12/fs2/inst/apps/<Context_Name>/appl/admin/<Context_Name>.xml -patchctxfile=/u01/app/EBSR12/fs1/inst/apps/<Context_Name>/appl/admin/<Context_Name>.xml -phase=prepare -logloc=/u01/app/EBSR12/fs_ne/EBSapps/log/adop/14/prepare_20150811_185137/<Context_Name> -promptmsg=hide"
    [UNEXPECTED]Error 1 occurred while Executing txkADOPValidation script on MYSERV

Reviewing the file $INST_TOP/apps/<Context_Name>/logs/appl/rgf/TXK/txkValidateDomainInRCOut.txt, the below error message is recorded:

cmd : java weblogic.WLST /u01/app/EBSR12/fs2/EBSapps/appl/ad/12.0.0/patch/115/bin/txkValidateDomainInRC.py --adminuser=weblogic --verify=domainEditModeEnabled --adminurl=t1://hostname.domain:adminport> /u01/app/EBSR12/fs2/inst/apps/<Context_Name>/logs/appl/rgf/TXK/txkValidateDomainInRCOut.txt
ERROR: Domain is in edit mode.

Cause:

Someone with administrator privileges on WLS Admin Console may have locked the Weblogic domain for making changes, and has not released the checkout.

This leaves the domain in edit mode, resulting in the issue.

Fix:

To resolve the issue test the following steps in a development instance and then migrate accordingly:

1. Start the admin server on the run file system (if not started already).
2. Login in to WLS Admin Console (http(s)://hostname.domain:<adminport>/console)
3. Click on the "Activate Changes" or the "Release Configuration" button (depending on the version) in the "Change Center" region on the top left corner.
4. Logout of the WLS console.
5. Rerun the adop phase=prepare command and confirm adop completes successfully.

ADOP Validation Phases:

ADOP Validation Phases:

These validations are performed in different phases of adop. In a multi-node system, some validations may only be executed only on the primary node, while others may be performed on all nodes.


1. Check all node entries in fnd_nodes table
Basic error message:

Information missing in FND_NODES table for one or more application tier nodes. For details, refer to log file on the relevant node.

Detailed error message:

ERROR: Missing entries in FND_NODES table.
Nodes present in FND_NODES: <valid Nodes List>
Nodes missing from FND_NODES: <invalid Nodes List>
Corrective Action: Run AutoConfig on the run file system of the nodes that are missing from the FND_NODES table.

2. Check all nodes have context files in FND_OAM_CONTEXT_FILES table for both run and patch file systems

Basic error message: 

There is a missing entry in the FND_OAM_CONTEXT_FILES table for at least one application tier node context file.

Detailed error message:

ERROR: Nodes with context files in the FND_OAM_CONTEXT_FILES table on both run and patch file systems: <validNodeList>
Nodes without context files in the FND_OAM_CONTEXT_FILES table on either/or run and patch file systems: <invalidNodeList>

Corrective Action:

- If the run file system context file for a node is missing, run AutoConfig on the run file system of that node to synchronize with the value with the database.
- If the patch file system context file of a node is missing, run AutoConfig on the patch file system of that node with the -syncctx option as follows to synchronize with the value with the database.

sh <AD_TOP>/bin/adconfig.sh contextfile=<CONTEXT_FILE> -syncctx

3. Checks related to S_JDKTOP and S_FMW_JDKTOP

Basic error message:

Value set for JDK_TOP (context variable s_jdktop) is invalid

Detailed error message: 

1. Sub-Validation: Check if jdktop and fmw_jdktop are pointing to the correct location.
Error message:
ERROR: The value of the s_jdktop context variable is incorrect.
Corrective Action: Contact Oracle Support to identify the best course of action.

2. Sub-Validation: Check if s_jdktop value is same on the run file system and database.
Error message:
ERROR: The value of the context variable s_jdktop for the run file system is not consistent between the file system and the database.
Corrective Action: Correct the value in the context file, and run AutoConfig to sync with the value in the database.

3. Sub-Validation: Check if s_fmw_jdktop value is same on run file system and database.
Error message:
ERROR: The value of the context variable s_fmw_jdktop for the run file system is not consistent between the file system and the database.
Corrective Action: Correct the value in the context file, and run AutoConfig to sync with the value in the database.

4. Sub-Validation: Check that s_jdktop has the same value on the current node and primary node.
Error message:
ERROR: Value of s_jdktop is not consistent with the value on the primary node.
Corrective Action: Update the value of s_jdktop to match the value on the primary node.

5. Sub-Validation: Check if s_fmw_jdktop has the same value on the current node and primary node.
Error message:
ERROR: Value of s_fmw_jdktop is not in sync with the value on the primary node.
Corrective Action: Update the value of s_fmw_jdktop to match the value on the primary node.

6. Sub-Validation: If JDK version is greater than 1.6, TXK code level should be greater than C.3
Error message:
ERROR:
JDK version: <java_version>
TXK code level: <txk_code_level>
Release 12.2 Delta 3 or higher requires a TXK code level with a JDK version higher than 1.6. This instance is at a lower TXK code level.
Corrective Action: Contact Oracle support to identify the best course of action.
Method Name validateJDKTop

4. Check consistency and validity of Oracle Inventory setup

Basic error message At least one Oracle inventory check has failed.
Detailed error message

1. Sub-Validation: Oracle Global Inventory does not exist.
Error message:
ERROR: Oracle Global Inventory does not exist.
Corrective Action: Provide the location of a valid inventory file.

2. Sub-Validation: Oracle Inventory Pointer location directory doesn't exist.
Error message:
Oracle Inventory Pointer location directory doesn't exist.
Corrective Action: Provide the location of a valid inventory file.

3. Sub-Validation: Oracle home directory is not present
Error message:
<run_oracle_home_loc> registered in inventory does not exist on file system.
Corrective Action: Provide the location of a valid inventory file.

4. Sub-Validation: Oracle home directory is not registered in the file system.
Error message:
ERROR: <run_oracle_Home_loc> is not registered in the inventory
Corrective Action: Provide the location of a valid inventory file. If you believe the inventory is valid, you may want to attach the <run_oracle_Home_loc>.

5. Sub-Validation: <run_oracle_Home_loc> does not exist on file system but still attached in inventory.xml.
Error message:
<run_oracle_Home_loc> does not exist on file system but still attached in inventory.xml.

6. Sub-Validation: Either <run_oracle_Home_loc> doesn't exist in inventory.xml or detached from inventory.xml.
Error message:
Either <run_oracle_Home_loc> doesn't exist in inventory.xml or detached from inventory.xml.

7. Sub-Validation: The user does not have write permission for inventory xml file.
Error message:
ERROR: The user does not have write permission for <inventory_xml_file>.
Corrective Action: Provide correct permissions for inventory.xml

8. Sub-Validation: The xml file either doesn't exist or doesn't have read permission.
Error message: Either<xml_file> file doesn't exist or doesn't have READ permission.

9. Sub-Validation: Dependency between webtier and oracle_common Oracle Home in inventory.
Error message:
Corrective Action: Resolve the dependency between Oracle_Home <webtier_oh_loc> and <oracle_common_oh_loc> in the inventory.
Method Name validateInventory

5. Check if APPL_TOP name is same in database and run file system

Basic error message:
APPL_TOP name is not set up properly for the current node.

Detailed error message:
ERROR: The value of the context variable s_atName is not consistent between the run context file in the file system and the database.
Corrective Action: Correct the value of s_atName in the run context file, then run AutoConfig to sync with the value in the database.
Method Name validateAtName

6. Check if instantiate instructions in the readme have been followed correctly

Basic error message:
OHS configuration files have not been instantiated from the latest AutoConfig templates.

Detailed error message: 
ERROR: File versions mismatch.
Template File: <template_file> <template_file_version>
Target File: <target_file> <target_file_version>

ERROR: Oracle HTTP service configuration file version does not match corresponding AutoConfig template file.
Corrective Action: Refer to My Oracle Support Knowledge Document 1617461.1 to apply the latest AD and TXK release update packs.
Method Name:  validateOHSTmplInst

7. Check if custom product tops have been added correctly

Basic error message: 
Custom product tops have not been added correctly.

Detailed error message: 
ERROR: The following custom products have been added inappropriately: <list of custom product tops>
Corrective Action: You can refer to My Oracle Support Knowledge Document 1577707.1 to add custom products. If you face any issue, you may contact Oracle Support to identify the best course of action.
Method Name validateCustProdTop

8. Check if AD and TXK code levels match

Basic error message: 
TXK RUP has been applied without applying the corresponding AD RUP.

Detailed error message:
ERROR: AD and TXK code levels are not in sync.
TXK code level: <txk_code_level>
AD code level: <ad_code_level>
Corrective Action: Apply the required RUP.
Method Name validateADTXKOrder

9. Check if adminserver status and web admin status are in sync

Basic error message:
Inconsistency detected in context file Admin Server information between nodes or file systems.

Detailed error message: 

1. Sub-Validation: check the values of s_adminserverstatus between RUN and PATCH file system.
Error message:
Value of s_adminserverStatus context variable is not consistent between run and patch file systems. Admin Server can be enabled only on the primary node.
Corrective Action: Amend value of s_adminserverstatus context variable.

2. Sub-Validation: check the values of s_adminserverstatus between RUN file system and database
Error message:
ERROR: Context file value of s_adminserverstatus on run file system is not consistent between the file system and database context file.
Corrective Action: Correct the value of the s_adminserverstatus context variable in the run file system context file, then run AutoConfig.

3. Sub-Validation: check the value of s_web_admin_status between RUN file system and database
Error message:
ERROR: Context file value of s_web_admin_status on run file system is not consistent between the file system and database context file.
Corrective Action: Correct the value of the s_web_admin_status context variable in the run file system context file, then run AutoConfig.

4. Sub-Validation: check the value of s_web_admin_status between RUN and PATCH file system
Error message:
Value of s_web_admin_status context variable is not consistent between run and patch file systems.
Corrective Action: Amend value of s_web_admin_status context variable
Method Name validateAdminSrvStatus
validateAdminSrvStatusAcrossFS

10. Check if multi-node related setup properties are correct

Basic error message:
Either the value of the context variable s_shared_file_system in the run file system is not consistent between the file system and the database or the APPL_TOP name across nodes is not set correctly.

Detailed error message:

1. Sub-Validation: Check if s_shared_file_system is in sync across RUN file system and database.
Error message:
ERROR: The value of the context variables_shared_file_system is not consistent between the run file system context file and the database.
Corrective Action: Correct the value of s_shared_file_system in the run context file, and run AutoConfig to sync with the value in the database.

2. Sub-Validation: Check if context variables s_atName and s_shared_file_system are not in sync
Error message:
ERROR: s_atName and s_shared_file_system context variables are not in SYNC.
Corrective Action: Contact Oracle Support to identify the best course of action.
Method Name validateMultiNodeSFSSync
validateMultiNodeATName

11. Check if any ports being used by E-Business Suite are listed in /etc/services

Basic error message:
At least one of the required ports for patch file system is reserved in /etc/services

Detailed error message: 
WARNING: This E-Business Suite instance is going to use the following ports listed in /etc/services.
If you want to use any of these ports for services which are not part of the E-Business Suite instance, you need to update /etc/services to use different ports for those non-EBS services.
Method Name validateETCServicesPorts

12. Check if any required ports on patch file system are already in use

Basic error message: 
Some of the ports specified for the patch file system are not available.
Corrective Action: Free the listed ports and retry the adop operation.

Detailed error message: 
ERROR: The following required ports are in use
<list_of_ports>
Corrective Action: Free the listed ports and retry the adop operation.
Method Name validatePatchFSPortPool

13. Check if localhost entry exists in /etc/hosts

Basic error message: 
Either some of the required entries in /etc/hosts file might be missing (e.g. localhost
or hostname) OR the file /etc/hosts could not be read.

Detailed error message:

1. Sub-Validation: more than one IP address with value of 127.0.0.1 found
Error message:
Corrective Action: Add multiple local hosts for the same IP address in the /etc/hosts file, as shown on the following line:
127.0.0.1 <localhost1.localdomain1> <localhost1>
<localhost2.localdomain2> <localhost2> …

2. Sub-Validation: more than one IP address with value of host IP address found
Error message:
Corrective Action: Add multiple hosts for the same IP address in the /etc/hosts file, as shown on the following line:
<IP> <hostname1.domain1> <hostname1> <hostname2.domain2> <hostname2> ...
Method Name validateETCHosts

14. Check if Weblogic Server domain is not in edit mode

Basic error message: 
Domain is in edit mode.

Detailed error message:
 
Domain might be locked by some other WLS user process.
Corrective Action: Release the edit lock and then restart the script.
Method Name validateDomainEditable

15. Check edit.lok file to see if domain is in edit mode

Basic error message:

Patch file system WebLogic domain edit lock is enabled.

Detailed error message:
ERROR: Edit session is enabled in the patch file system.
Corrective Action: Release the edit lock and then restart the script.
Method Name validateEditLockEnabled


Post E-Business Suite 12.2.5 Applications Upgrade issues

Post E-Business Suite 12.2.5 Applications Upgrade issues:

The following error occurs when running FS_CLONE:

ERROR
-----------------------
Finished upgrade of 12.2.0 to 12.2.5.  Now when running adop phase=fs_clone the following error occurs:

Checking for existing adop sessions.

  Continuing with existing session [Session ID: 10].
  Session Id : 10
  Prepare phase status : NOT COMPLETED
  Apply phase status : NOT COMPLETED
  Cutover phase status : NOT COMPLETED
  Abort phase status : NOT COMPLETED
  Session status : FAILED
  [UNEXPECTED]Cannot run fs_clone while an existing patching cycle is active


Cause:

The s_apps_jdbc_connect_descriptor string is removed from the Patch file system context file.

Using the string from the Run file system context file to replace the s_apps_jdbc_connect_descriptor value in the Patch file system context file is a valid workaround.

Fix:

To resolve the issue test the following steps in a development instance and then migrate accordingly:
1. Update the patch context file with s_apps_jdbc_connect_descriptor.
2. Copying the value from the Run to the Patch context file.
3. Run FS_Clone again and confirm the error no longer occurs.

Sunday, 16 April 2017

Upgrade EBS 12.2.0 to 12.2.5

Upgrade EBS 12.2.0 to 12.2.5

All Oracle EBS Fresh installations will configure base release 12.2.0, which has to be upgraded separately after the successful completion of the installation.

We will cover the upgrade process of a freshly installed Oracle EBS system from release 12.2.0 to 12.2.5.

You may checkout below link for fresh EBS installation using below link:

Oracle EBS 12.2.5 installation

As the first step, you should install patch 17537119 (EBS Technology Codelevel Checker (ETCC)), which will provide output of all the latest available patches that are missing on the current instance. You should ensure that you have downloaded the latest version of this patch from Oracle Support.

This patch will have two scripts:

checkDBpatch.sh
checkMTpatch.sh

Execution of checkMTpatch.sh: Set the env and run below.

[applmgr@ol5-r122-ebs1 ~]$  sh checkMTpatch.sh 

we get the list of below patches that need's to be applied on application techstacks.

========================================================================
PATCH RECOMMENDATION SUMMARY
========================================================================
One or more products have bugfixes missing.
The default patch recommendations to install these missing bugfixes are:

-------------------------------------------------------------------------------
Oracle Forms and Reports 10.1.2.3.0
-------------------------------------------------------------------------------
  Patch 24946444  - Filename: p24946444_101232_LINUX.zip
-------------------------------------------------------------------------------
Oracle Fusion Middleware (FMW) - Web Tier 11.1.1.9.0
-------------------------------------------------------------------------------
  Patch 22288381   - Filename: p22288381_111190_Generic.zip
-------------------------------------------------------------------------------
Oracle Fusion Middleware (FMW) - oracle_common 11.1.1.9.0
-------------------------------------------------------------------------------
  Patch 9905685      - Filename: p9905685_111190_Generic.zip
  Patch 21366277    - Filename: p21366277_111190_Generic.zip
  Patch 21628307    - Filename: p21628307_111190_Generic.zip
  Patch 24606362    - Filename: p24606362_111190_Generic.zip
-------------------------------------------------------------------------------
Oracle WebLogic Server (WLS) 10.3.6.0.7
-------------------------------------------------------------------------------
  Patch 23743997 [SU Patch [K25M]: WLS PSU 10.3.0.6.161018]
    - Filename: p23743997_1036_Generic.zip
========================================================================

Execution of checkDBpatch.sh: Set the env and run below.


[oracle@ol5-r122-ebs1 ~]$  sh checkDBpatch.sh 

========================================================================
PATCH RECOMMENDATION SUMMARY
========================================================================
The default patch recommendations to install these missing bugfixes are:
-------------------------------------------------------------------------------
Oracle Database Release 12.1.0.2  (No PSU applied)
-------------------------------------------------------------------------------
  Patch 23595848    - Filename: p23595848_121020_Linux-x86-64.zip
  Patch 18793246    - Filename: p18793246_121020_Generic.zip
  Patch 24911308    - Filename: p24911308_121020_Linux-x86-64.zip
  Patch 19591608    - Filename: p19591608_121020_Linux-x86-64.zip
  Patch 19908836    - Filename: p19908836_121020_Linux-x86-64.zip
  Patch 20766180    - Filename: p20766180_121020_Generic.zip
  Patch 24481723    - Filename: p24481723_121020_Linux-x86-64.zip
  Patch 22098146    - Filename: p22098146_121020_Linux-x86-64.zip
  Patch 21321429    - Filename: p21321429_121020_Generic.zip
  Patch 21864513    - Filename: p21864513_121020_Linux-x86-64.zip
  Patch 21904072    - Filename: p21904072_121020_Linux-x86-64.zip
  Patch 21967332    - Filename: p21967332_121020_Linux-x86-64.zip
  Patch 22338374    - Filename: p22338374_121020_Linux-x86-64.zip
  Patch 22496904    - Filename: p22496904_121020_Linux-x86-64.zip
  Patch 22731026    - Filename: p22731026_121020_Generic.zip
  Patch 23089357    - Filename: p23089357_121020_Linux-x86-64.zip
  Patch 24560906    - Filename: p24560906_121020_Linux-x86-64.zip
+-----------------------------------------------------------------------------+

Apply : Oracle Database Release 12.1.0.2 Patches: 

Bring down Application, Database and listener.
Apply all Database patches recommended by ETCC

[oracle@ol5-r122-ebs1 ~]$  which opatch
/u01/app/oracle/r12ebs/12.1.0/OPatch/opatch
[oracle@ol5-r122-ebs1 ~]$  cd 23595848
[oracle@ol5-r122-ebs1 23595848]$ opatch apply

Sometimes you may see patch conflicts with critical patch updates (CPUs)/patchset upates (PSUs) installed, in that case, you may need to roll back certain patches and install certain patches with patch
conflict resolution.

I have demonstrated installation of only one patch on RDBMS home. We should follow the same process for Installing other RDBMS patches as recommended by ETCC.

After installing the patches start the database and listener, copy the adgrants.sql script from $APPL_TOP/admin/ to the database tierb and execute the script from the database tier.
Run utlrp.sql and validate we don't have any invalids.

Apply: Oracle Application Home 10.1.2.3.0 Patches:

[applmgr@ol5-r122-ebs1 ~]$ cd 24946444
[applmgr@ol5-r122-ebs1 24946444]$ which opatch
/u01/app/EBSR12/fs1/EBSapps/10.1.2/OPatch/opatch
[applmgr@ol5-r122-ebs1 24946444]$ echo $ORACLE_HOME
/u01/app/EBSR12/fs1/EBSapps/10.1.2
[applmgr@ol5-r122-ebs1 24946444]$ opatch apply

Apply: Oracle Fusion Middleware (FMW) - Web Tier 11.1.1.9.0 Patches:

[applmgr@ol5-r122-ebs1 ~]$ cd 22288381
[applmgr@ol5-r122-ebs1 22288381]$ export ORACLE_HOME=/u01/app/EBSR12/fs1/FMW_Home/webtier
[applmgr@ol5-r122-ebs1 22288381]$ opatch apply

Apply : Oracle Fusion Middleware (FMW) - oracle_common 11.1.1.9.0 Patches:

[applmgr@ol5-r122-ebs1 ~]$ cd 9905685
[applmgr@ol5-r122-ebs1 9905685]$ export ORACLE_HOME=/u01/app/EBSR12/fs1/FMW_Home/oracle_common
[applmgr@ol5-r122-ebs1 9905685]$ opatch apply

apply other patches 21366277, 21628307, 24606362 similarily.

Apply: Oracle WebLogic Server (WLS) 10.3.6.0.7 Patches:

The following patch must be installed on WebLogic Server before proceeding with the upgrade. 

Patch 23743997 [SU Patch [K25M]: WLS PSU 10.3.0.6.161018] 

This patch gets conflicts with below existing patches:
you must remove all conflicts and apply
patch 
23743997 using the bsu.sh utility.

CW9T, VKXF, FCX7, Y5AP, 1LRI, 2GYW, BLTG

Patch 23743997 (K25M) requires below prerequisite patches:

13729611 Z9PC
17319481 9KCT
19259028 KRDE
19687084 NJVF
22323006 DI8E
24608998 QMJP

Install all above patches using BSU and apply Patch 23743997.


[applmgr@ol5-r122-ebs1 bsu]$ cd /u01/app/EBSR12/fs1/FMW_Home/utils/bsu

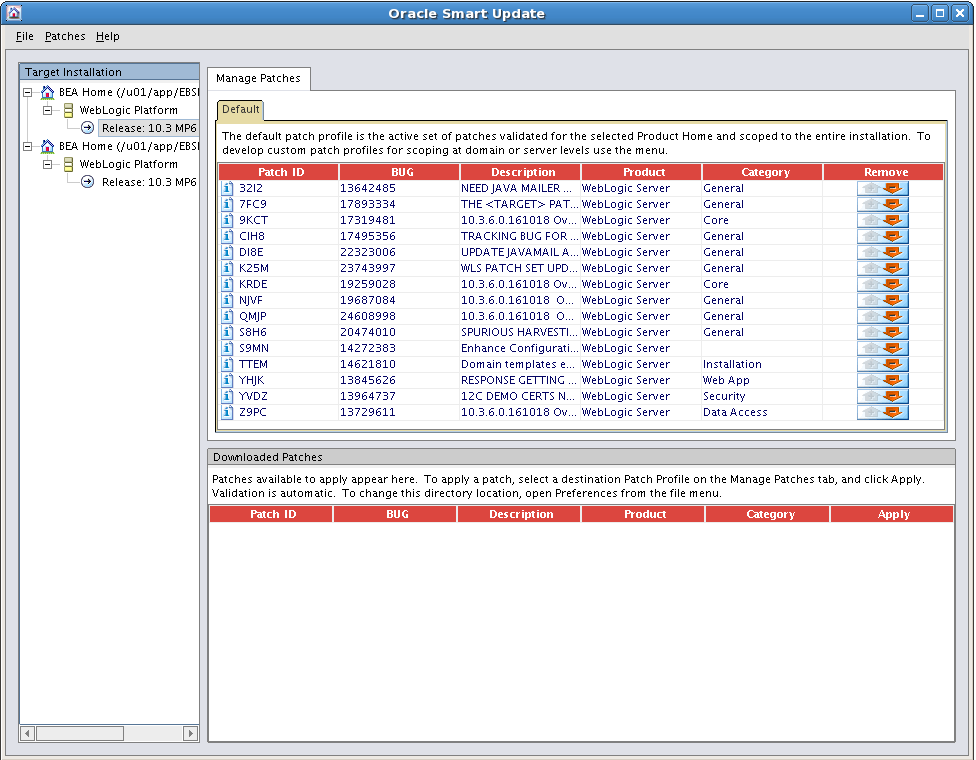
[applmgr@ol5-r122-ebs1 bsu]$ ./bsu.sh

Below is the screenshot of BSU utility.


Applying AD and TKX Patches:

The patch sequence, patch numbers, and options may change, so it’s recommended that you refer to MOS tech note “Applying the Latest AD and TXK Release Update Packs to Oracle E-Business Suite Release 12” (Doc ID 1617461.1) before applying these patches. The patching sequence and options provided should be used as mentioned or the patching cycle may encounter issues.

p20745242_R12.AD.C_R12_LINUX.zip
p20784380_R12.TXK.C_R12_GENERIC.zip
p22123818_R12.AD.C_R12_LINUX.zip
p22363475_R12.TXK.C_R12_GENERIC.zip
p22495069_R12.TXK.C_R12_GENERIC.zip

Copy all above patches to PATCH TOP dir:

[applmgr@ol5-r122-ebs1 ~]$ cd /u01/app/EBSR12/fs_ne/EBSapps/patch

- Make sure we have taken before applying these patches.
- Start the WebLogic admin server from the RUN file system.
- Run adgrants.sql from the respective patch directories before applying the patch.

The patch 20745242 (R12.AD.C.Delta.7) contains a newer version of the adgrants.sql script, so
it’s mandatory to execute this script from the database tier as

[applmgr@ol5-r122-ebs1 ~]$ adop phase=apply patches=20745242 hotpatch=yes

Similarly, the patch 22123818:R12.AD.C also contains the adgrants.sql script. Execute the script before applying this patch.

[applmgr@ol5-r122-ebs1 ~]$ adop phase=apply patches=22123818 hotpatch=yes

After installing these patches, you can merge patches 20784380, 22363475, and 22495069 and install it

[applmgr@ol5-r122-ebs1 ~]$ adop phase=apply patches=20784380,22363475,22495069

hotpatch=yes merge=yes

-Execute AutoConfig on the database tier.
-Migrate the latest code on the database tier using $AD_TOP/bin /admkappsutil.pl.
-Restart the database and application tiers.

Once after applying all the patches, lets run ETCC (EBS Technology Codelevel Checker) and get the confirmation that all the required pathces has been applied on all the technology stacks.

[applmgr@ol5-r122-ebs1 ~]$  sh checkDBpatch.sh 
[applmgr@ol5-r122-ebs1 ~]$  sh checkMTpatch.sh 

Installation of 12.2.5 Upgrade Patch

The preparation of the EBS 12.2.5 patch upgrade is complete. Now the system is almost ready for installing an upgrade patch. Follow these steps

-- Set optimizer_adaptive_features to FALSE. It’s recommended that you set this to FALSE because of performance issues during upgrade.
-- Source the RUN file system and stop all the application services.
-- Ensure there is no active patching cycle using "adop -status"
-- Install 12.2.5 Upgrade patch 19676458 in downtime mode.

[applmgr@ol5-r122-ebs1 ~]$ adop phase=apply apply_mode=downtime patches=19676458
Enter the APPS password:
Enter the SYSTEM password:
Enter the WLSADMIN password:

-- Verify the logs and execute the cleanup phase.

[applmgr@ol5-r122-ebs1 ~]$ adop phase=cleanup
Enter the APPS password:
Enter the SYSTEM password:
Enter the WLSADMIN password:

-- After cleanup, run the fs_clone to sync the another file system with first one.

[applmgr@ol5-r122-ebs1 ~]$ adop phase=fs_clone

-- Revert the DB parameter changes: optimizer_adaptive_features to TRUE.

The upgrade of Oracle EBS 12.2.0 to 12.2.5 has completed successfully.

Post Upgrade:

Please ensure all the services came up normally and you are able to access the front end page.


Sunday, 9 April 2017

Hello DBA's,

Welcome to my Blog, I have recently started writing blog on various Oracle topics.

Oracle Application DBA's stuff.
Oracle Core DBA's stuff.
Oracle Fusion DBA's stuff.

I will try updating my blog on above topics.

Please let me know it help you on drafting your career towards DBA profile. You Are always welcome to suggest me new topics and ideas to improve this blog.

Lets Learn together Online!! Happy Learning!! :)

~Pankaj


Saturday, 8 April 2017

Oracle EBS 12.2.5 installation

Oracle EBS 12.2.5 installation  (Single Node) 

The Rapidwiz Install Wizard is the only utility that supports the installation of Oracle E-Business Suite 12.2. An installation of the Oracle E-Business Suite should be planned appropriately to avoid any issues during the install phase. Incorrect configuration will lead to a failed installation and will cost time and resources.

Here are the Prerequisite which we need to follow before we go for Rapidwiz.

Note: I have used below configuration for Oracle Linux 5 x86-64 with 16 GB RAM. 

Space Requirements


For 12.2.5 application fresh installation you need minimum 300 GB Space.

Stage and patch Area : 55 + 50 GB
Oracle Database (12.1.0.2): 90 DB (fresh DB - without sample schema)
Oracle application dual file system: 75 GB
Post this we need buffer space to make our application operational..

Software Requirements


Oracle EBS application 12.2 supports only 64 bit OS.


Operating System NameSupported Version
Oracle Linux5 - Update 5 or higher (64-bit)1
Oracle Linux6 - Update 1 or higher (64-bit)1
Oracle Linux7 - Update 0 or higher (64-bit)
Red Hat Enterprise Linux5 - Update 5 or higher (64-bit)1
Red Hat Enterprise Linux6 - Update 1 or higher (64-bit)1
Red Hat Enterprise Linux7 - Update 0 or higher (64-bit)
SUSE Linux Enterprise Server10 - SP2 or higher (64-bit)2
SUSE Linux Enterprise Server11 - SP2 or higher (64-bit)

Software Tools Requirements


Make sure we have below tools.
Linux x86-64 -ar, gcc, g++, ld, ksh, make, X Display Server

Kernel Version


Minimum version of kernel parameter
Oracle Linux 5 2.6.18-194.0.0.0.3.EL5
In our case it was:
[root@ol5-r122-ebs1 ~]# uname -r
2.6.32-300.10.1.el5uek

Operating System Packages


Below are the list of all  packages which we need to install for Oracle Linux 5 or RHEL 5

Note: Make sure you install openmotif packages as it is, not its upgraded versions. (for example, openmotif-2.2.3-10.RHEL4.5 is not supported).

openmotif21-2.1.30-11.EL5.i3861
xorg-x11-libs-compat-6.8.2-1.EL.33.0.1.i386

Additionally, the following rpm needs to be installed from the Oracle Linux 5 or RHEL 5 distribution media on the application tier:

libXrender-0.9.1-3.1.i386

If not using the pre-install rpm, the following packages must be installed from the Oracle Linux 5 or RHEL 5 distribution media on both application and database tiers:

compat-libstdc++-296-2.96-138.i386
compat-libstdc++-33-3.2.3-61.i386
gcc-4.1.2-48.el5.x86_64
gcc-c++-4.1.2-48.el5.x86_64
glibc-2.5-49.i686 (32-bit)
glibc-2.5-49.x86_64
glibc-common-2.5-49.x86_64
glibc-devel-2.5-49.i386 (32-bit)
glibc-devel-2.5-49.x86_64
libgcc-4.1.2-48.el5.i386
libgcc-4.1.2-48.el5.x86_64
libstdc++-devel-4.1.2-48.el5.i386
libstdc++-devel-4.1.2-48.el5.x86_64
libstdc++-4.1.2-48.el5.i386
libstdc++-4.1.2-48.el5.x86_64
libXi-1.0.1-4.el5_4.i386
libXp-1.0.0-8.1.el5.i386
libXp-1.0.0-8.1.el5.x86_64
libXtst-1.0.1-3.1.i386
libaio-0.3.106-5.i386
libaio-0.3.106-5.x86_64
libgomp-4.4.0-6.el5.x86_64
make-3.81-3.el5.x86_64
gdbm-1.8.0-26.2.1.i386
gdbm-1.8.0-26.2.1.x86_64
redhat-lsb-3.1-12.3.EL.0.2.x86_64
sysstat-7.0.2-3.el5.x86_64
util-linux-2.13-0.52.el5_4.1.x86_64

Additionally, the following RPMs are required for the database tier:(In our single node case we will install on the same server)

compat-libstdc++-33-3.2.3-61.x86_64
elfutils-libelf-0.137-3.el5.x86_64 (for startCD 50 or earlier)
elfutils-libelf-devel-0.137-3.el5.x86_64 (for startCD 50 or earlier)
elfutils-libelf-devel-static-0.137-3.el5.x86_64 (for startCD 50 or earlier)
libaio-devel-0.3.106-5.i386
libaio-devel-0.3.106-5.x86_64
unixODBC-2.2.11-7.1.i386
unixODBC-devel-2.2.11-7.1.i386

Alternatively on the database tier, users can install the following rpm (available via ULN on http://linux.oracle.com or the Oracle Public yum repository on http://public-yum.oracle.com) on Oracle Linux:

oracle-validated-1.1.0-15.el5.x86_64

The E-Business Suite Pre-Install RPM includes all the above required rpms and dependencies for running the application and database tiers on Oracle Linux - see the 'E-Business Suite Pre-Install RPM' section below for more details.

Update Kernel Paramater as below: 


[root@ol5-r122-ebs1 ~] vi /etc/sysctl.conf

net.ipv4.ip_forward = 0
net.ipv4.conf.default.rp_filter = 2
net.ipv4.conf.default.accept_source_route = 0
kernel.core_uses_pid = 1
net.ipv4.tcp_syncookies = 1
fs.file-max = 6815744
kernel.msgmni = 2878
kernel.msgmax = 8192
kernel.msgmnb = 65536
kernel.sem = 250 32000 100 142
kernel.shmmni = 4096
kernel.shmall = 2097152
kernel.shmmax = 4294967295
kernel.sysrq = 1
net.core.rmem_default = 262144
net.core.rmem_max = 4194304
net.core.wmem_default = 262144
net.core.wmem_max = 1048576
fs.aio-max-nr = 1048576
net.ipv4.ip_local_port_range = 9000 65500

vm.min_free_kbytes = 51200

Once after changes activate the changes: sysctl -p

Verify the Soft and Hard Shell Limits


[root@ol5-r122-ebs1 ~]# cat /etc/security/limits.conf
# Oracle-Validated setting for nofile soft limit is 131072
oracle   soft   nofile    4096
applmgr  soft   nofile    4096
# Oracle-Validated setting for nofile hard limit is 131072
oracle   hard   nofile    65536
applmgr  hard   nofile    65536
# Oracle-Validated setting for nproc soft limit is 131072
oracle   soft   nproc    2047
applmgr  soft   nproc    2047
# Oracle-Validated setting for nproc hard limit is 131072
oracle   hard   nproc    16384
applmgr  hard   nproc    16384
# Oracle-Validated setting for core soft limit is unlimited
oracle   soft   core    unlimited
# Oracle-Validated setting for core hard limit is unlimited
oracle   hard   core    unlimited
# Oracle-Validated setting for memlock soft limit is 50000000
oracle   soft   memlock    50000000
# Oracle-Validated setting for memlock hard limit is 50000000
oracle   hard   memlock    50000000
# oracle-ebs-server-R12-pre-install setting for stack soft limit is 10240KB
oracle   soft stack 10240
applmgr  soft stack 10240
# oracle-ebs-server-R12-pre-install setting for stack hard limit is 32768KB
oracle   hard stack 32768
applmgr  hard stack 32768

Verify System Configuration Files


The /etc/hosts file should be configured as listed with a loopback address and fully qualified domain name,and you should verify that the hostname and IP address is pinging.
[root@ol5-r122-ebs1 ~]# cat /etc/hosts
127.0.0.1       localhost.localdomain localhost
192.168.0.10   ol5-r122-ebs1.example.com ol5-r122-ebs1

Create Directories and Change Permissions and Ownership

[root@ol5-r122-ebs1 ~]# mkdir -p /u01/app/oracle
[root@ol5-r122-ebs1 ~]# mkdir -p /u01/app/EBSR12
[root@ol5-r122-ebs1 ~]# chmod -R 775 /u01/app/oracle
[root@ol5-r122-ebs1 ~]# chmod -R 775 /u01/app/EBSR12
[root@ol5-r122-ebs1 ~]# chown -R oracle:dba /u01/app/oracle
[root@ol5-r122-ebs1 ~]# chown -R applmgr:oinstall /u01/app/EBSR12

Create Inventory Dirs:


[root@ol5-r122-ebs1 ~]# cat /etc/oraInst.loc 
inventory_loc=/u01/app/oraInventory
inst_group=oinstall
[root@ol5-r122-ebs1 ~]# mkdir -p /u01/app/oraInventory
[root@ol5-r122-ebs1 ~]# chown -R oracle:dba /u01/app/oraInventory
[root@ol5-r122-ebs1 ~]# chmod -R 777 /u01/app/oraInventory

Preparing the Stage Area:


The stage area is where all software installation binaries will be placed. Usually the stage area will be a single directory location where all the software installation files are located
The software is available for download from the Oracle Software Delivery Cloud (http://edelivery.oracle.com ) under the E-Business Suite section.
Once after downloading the EBS software, unzip the start CD to any dir (/u01/app/StageR122/startCD/).

[root@ol5-r122-ebs1 bin]# cd /u01/app/StageR122/startCD/Disk1/rapidwiz/bin
[root@ol5-r122-ebs1 bin]# sh buildStage.sh
                      Build Stage Menu
   ------------------------------------------------------
   1.     Create new stage area
   2.     Copy patches to existing stage area
   3.     List files in TechPatches directory
   4.     Exit menu

   Enter your choice [4]: 1

            Rapid Install Platform Menu
   ------------------------------------------------------
   1.    Oracle Solaris SPARC (64-bit)
   2.    Linux x86 (64-bit)
   3.    IBM AIX on Power Systems (64-bit)
   4.    HP-UX Itanium
   5.    Exit Menu

   Enter your choice [5]: 2

Running command:
/u01/app/StageR122/startCD/..............................................................
....................................................................rapidwiz/bin Linux_x64 Linux_x64


Specify the directory containing the zipped installation media:
<Provide path of directory where we have downloaded the software>

Single-Node Installation

Make sure you set the DISPLAY variable:
[root@ol5-r122-ebs1 ~]#xclock (should return graphical clock)
Perform below if you still getting issue with clock.
[root@ol5-r122-ebs1 ~]# xhost +

[root@ol5-r122-ebs1 ~]# cd /u01/app/StageR122/startCD/Disk1/rapidwiz
[root@ol5-r122-ebs1 ~]#./rapidwiz

[Welcome Page] Main installation screen that will list the tech stack components that will install Oracle EBS.

[Wizard Operation] Here two options are available, Install and Upgrade. You are performing a Fresh installation here, so you should choose the Install option.

[Oracle Configuration Manager Details]Rapidwiz screen for configuring the Oracle Support credentials, which are required for Oracle Configuration Manager. If you have valid credentials and the server is connected to the Internet, then you should provide these details. Otherwise, you can skip this option and configure them after installation.

[Configuration Choice] This configuration screen has two options: “Create a new configuration” and “Load the following saved configuration.” If you are performing a Fresh install, then you should select the first option for creating a new configuration. “Load the following saved configuration” is required for multinode installations.

[Database Node] “Create a new configuration” will store all the provided configuration settings in a text file, and later it will save this information into a database during the database tier configuration phase. Choose the database type (Fresh or Vision) based on selecting “Vision demo database/Fresh database will be installed.” The Vision database option will install sample business data that can used for evaluating the product and performing Proof of concept (POC). The Fresh database option will not install any business data, and this is the only option that will used for a production implementation.

[Licensing Selection] Below image shows two options: Suite Licensing and Component Licensing . You have to choose an option based on your company’s license agreement. If your organization is entitled to use suite licensing, then by default Rapidwiz will register all products included in the application price bundle.
The Component Licensing option will allow you to choose individual components to license, and you
have to select components based on your organization’s license agreement.

[Licensing Page] Below Image shows display a list of licensed products; the products that are checked and grayed out are licensed as part of suite licensing. On this screen you can license additional products, but these additional products will not be part of the suite licensing bundle. You need to have a separate license for any additional products.

[Country-specific functionalities] This shows of all the available country-specific functionalities, and it will allow you to choose a country specific to your localization. Consider that a company is running in the United States, Australia, and Brazil. The localization rules and labor laws will be different across these countries, so this option will allow the application to accommodate other country-specific functionalities in Oracle E-Business Suite.


[Internationalization Settings] The Internationalization Settings allows you to add any additional language to your Oracle E-Business Suite installation. Based on other languages, you should choose the character set for the database and applications.
You should select the character set type carefully. It is difficult to change the character set after installation, and there are many restriction for character set conversion. For example, you can convert the character set from USASCII7 to AL32UTF8, but you cannot convert the character set from  AL32UTF8 to USASCII7. AL32UTF8 supports almost all languages, so it’s recommended that you use AL32UTF8 if there is a chance of using more than two different languages.

[Primary Application Node] The Primary Applications Node configuration allows you to provide inputs for OS user, group, and directory locations for installation. It requires locations for Apps Base Dir and Apps Instance Dir.
Note : Rapidwiz will not allow you to select two different locations for the RUN and PATCH file systems. By default all application services will be enabled on the primary application tier node.

[The Application User Information] it allows you to configure all application superuser passwords. In earlier releases, the superuser password was configured by default, and you had to change these passwords as a post-install step. In my case i kept default password for all application products.


[Node Information] It summarizes the nodes that are used in the EBS installation topology.


[System Checks] Rapidwiz will perform the full pre-install checks that are required to be in place to avoid issues during the installation process. below is the illustration of the Rapidwiz pre-install checks.


[Pre install checks] The Validate System Configuration will perform the prerequisites checks for all the previously listed settings, and all these items should have green check mark to proceed with the installation. If there are any errors or warnings for any of this configuration, then you should fix them before proceeding with the installation.

[Component Installation Review] It list of technology stack components that Rapidwiz will install and the configuration of the language setting that Rapidwiz will perform.Proceed with Installation once you see everything looks okay.


[EBS installation is in progress] Rapidwiz will install different technology stack components in different stages. There are a total of eight steps for installation, and for a successful installation, all these steps should complete successfully.


[Post Installation checks] After all the installation steps are performed, Rapidwiz will perform the post-installation checks to validate the system configuration and services.

[Finish] With this, you are done with the single-node installation process, but you should perform the post-installation steps once the installation is completed.


Post-installation Steps for the Application:

Once after installation validate the file system..

NOTE:
EBS 12.2 is installed as the base release 12.2.0, which is not supported and required to be immediately upgraded to a supported patchset, currently we have 12.2.6 available.

We will Go for the upgrade from 12.2.0 to 12.2.5 in next section..


Oracle EBS 12.1.x installation

Oracle EBS 12.1.x installation (Coming Soon......)

Tuesday, 28 March 2017

Oracle 12c DB installation

Oracle 12c DB installation

Here are the easy steps to install the Oracle 12c (12.1.0.2)  Database.

Steps 1: Setup your server with required space and user creation.

[root@ol5-12c-cdb ~]# groupadd oinstall
[root@ol5-12c-cdb ~]# useradd -g oinstall oracle
[root@ol5-12c-cdb ~]# passwd oracle

We will use below dir's for 12c DB software installation.

Oracle Base: /u01/app/oracle
DB Home: /u01/app/oracle/product/12.1.0/dbhome_1

Inventory: /u01/app/oraInventory

[root@ol5-12c-cdb ~]# xhost +
access control disabled, clients can connect from any host
[root@ol5-12c-cdb ~]# su - oracle
[oracle@ol5-12c-cdb ~]$ cd  /media/sf_Oracle_Base/sw12.1.0.2db/database
[oracle@ol5-12c-cdb database]$ ./runInstaller

[Step1]  If you have valid credentials and the server is connected to the Internet, then you should provide these details. Otherwise, you can skip this option and configure them after installation.


[Step-2] Select "Install Database software only"
We will create the container database along with PDB's in later posts.


[Step-3] Select "Single instance database instance" and click next..


[Step-4]Select your preferred language and click next..


[Step-5] Click Next..


[Step-6] Provide directory paths for oracle base and oracle home software.


[Step-7] Provide path for Central Inventory. Select group as oinstall.


[Step-8] select group "oinstall" and click next..


[Step-9] We may ignore this error and proceed further with installation.


[Step-10] It lists all the details, Review once and click Install.


[Step-11] Installation is in Progress...


[Step-12] Once after installation we need to run below scripts as a root user.

/u01/app/oraInventory/orainstRoot.sh
/u01/app/oracle/product/12.1.0/dbhome_1/root.sh


Please choose default options while running the scripts

Script:1
---------------------------------------------------------------------------------
[root@ol5-12c-cdb ~]# sh /u01/app/oraInventory/orainstRoot.sh
Changing permissions of /u01/app/oraInventory.
Adding read,write permissions for group.
Removing read,write,execute permissions for world.

Changing groupname of /u01/app/oraInventory to oinstall.
The execution of the script is complete.
---------------------------------------------------------------------------------
Script:2
---------------------------------------------------------------------------------
[root@ol5-12c-cdb ~]# sh /u01/app/oracle/product/12.1.0/dbhome_1/root.sh
Performing root user operation.

The following environment variables are set as:
    ORACLE_OWNER= oracle
    ORACLE_HOME=  /u01/app/oracle/product/12.1.0/dbhome_1

Enter the full pathname of the local bin directory: [/usr/local/bin]:
   Copying dbhome to /usr/local/bin ...
   Copying oraenv to /usr/local/bin ...
   Copying coraenv to /usr/local/bin ...


Creating /etc/oratab file...
Entries will be added to the /etc/oratab file as needed by
Database Configuration Assistant when a database is created
Finished running generic part of root script.
Now product-specific root actions will be performed.
---------------------------------------------------------------------------------

Oracle Database Software installation has been completed.

Click on below link for Container DB creation.

Container DB creation (Coming soon..)